System Restore is an amazing option to troubleshoot your system when something goes wrong.
What is System Restore?
According to Wikipedia, System Restore is an option in windows operating the system that restores your computer to earlier created restore point without affecting any of your documents, its only change settings, and hardware and software change in your computer after the creating restore point. If you are planning to make some major software or hardware changes or major software or OS update on your PC then you should consider creating the System Restore point on your system when it is working fine it will be the saviour for you if something went wrong. To create the system restore point just follow these following steps…!!
How to Create System Restore Point on Windows 7?
1. Right click on My Computer and then click on Properties.
>>> Or go to Control Panel >>> Open System
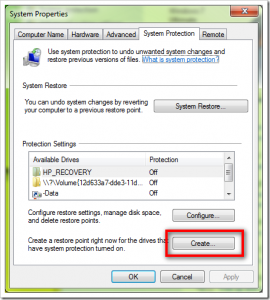
2. A system properties window will open, view below screenshot
3. Click on System Protection. (If System Properties window open other tab by default)
4. A new small window will open where you have option tab like “computer name, hardware, advance, system protection, and remote. By clicking on System Protection in step 3. You will automatically bring to the system protection tab where you have to be.
5. Click on the “create” button(see above image)
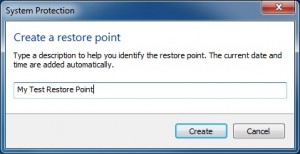
6. Put any restore point name and click on and create.
After a few seconds, you will get a successful message.
Related Post: How to Restore System with “System Restore Point”?


![How-to Recover Accidentally Deleted Files [Sponsored] How-to Recover Accidentally Deleted Files-techinfoBiT-top tech tips blog india](https://www.techinfobit.com/wp-content/uploads/2018/11/How-to-Recover-Accidentally-Deleted-Files-techinfoBiT-top-tech-tips-blog-india-218x150.jpg)


