Information
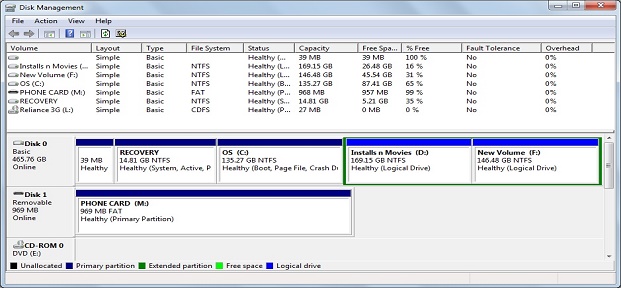
This post will show you how to shrink an existing partition or volume using Disk Management or Diskpart on Windows 7 to create unallocated disk space, from which you can create a new partition or volume.
Note: To proceed any further you need to be sure that you are logged in as an administrator.
How To Shrink A Partition Or Volume On Windows 7
Method One: Using Disk Management
1. Open Control Panel (All items view), and click on the Administrative Tools icon. then close the Control Panel window.
2. Click on Computer Management in Administrative Tools, then close the Administrative Tools window.
3. In the left pane under Storage, click on Disk Management.
4. In the middle pane, right click on the partition that you want to shrink and select “Shrink Volume”.
5. Enter the size of the disk you wanted to shrink from the availabe disk space [MB (1 GB = 1024 MB)]
The size of the available disk space to shrink can be restricted by the amount of space currently allocated to on the hard drive for the virtual memory page file, System Protection maximum storage space size, and hibernation files.
As such, if these unmovable files are located in the middle of the total amount of free space on the disk, then only the amount of free space on the other side (to the right) of these files will actually be available to shrink and create a new partition on the disk.
The only to solve this is to use a 3rd party hard drive partition software or create the partition when installing you Windows for the first Time or while formatting the system.
6. Hoping that the selected partition (in step 4) has now shrunk to create a new empty unallocated space. You can use this new unallocated space to create a new partition.
7. Close the Computer Management window.
Method One: Using Diskpart in an Elevated Command Prompt
1. Open a elevated command prompt, or a command prompt while booting your system.
2. In the elevated command prompt, type “diskpart” and press Enter.
3. In the elevated command prompt, type “list volume” and press Enter to get the list of volume available to shrink.
4. In the elevated command prompt, type select volume # and press Enter. (# represents the disk number.)
5. In the elevated command prompt, type “shrink querymax” and press Enter.
NOTE: This will give you the maximum amount of size in MB that you can shrink the selected partition or volume (step 4) by to be used as the new unallocated space. For example, I have 234GB available to shrink.
6. To Shrink All of the Available Space –
A) In the elevated command prompt, type shrink and press Enter.
NOTE: This will shrink the selected partition or volume by all of the maximum number of reclaimable bytes (step 4) to be used for the new unallocated space.
B) Go to step 8.
7. To Shrink the Available Space by a Specified Size –
A) In the elevated command prompt, type shrink desired=(# in MB) and press Enter.
NOTE: You would substitute (# in MB) for how many MB (1 GB = 1024 MB) you want to shrink the selected partition or volume (step 4) by to be used for the new unallocated space. For example, if I only wanted to shrink the partition or volume by 81920 MB (80 GB), then I would type shrink desired=81920 and press Enter.
8. In the elevated command prompt, type exit and press Enter.
9. Close the elevated command prompt.
10. The selected partition (step 4) has now been shrunk to create a new empty unallocated space. You can use this new unallocated space to create a new partition with.
for more detail visit sevenforums.com


