I received several emails lately to set up email clients so that they could retrieve Gmail emails using the POP3 protocol. The Gmail POP3 configuration is fortunately not that complex. The POP3 has to be enabled in the Gmail web interface before they can actually retrieve their emails in another email client.
Enabling POP3 in Gmail is, therefore, a two-step process. POP3 needs to be enabled on the Gmail accessing gmail.com first before email client configured to connect Gmail using the POP3 protocol.
Enabling Gmail POP3: How To Configure Gmail POP3
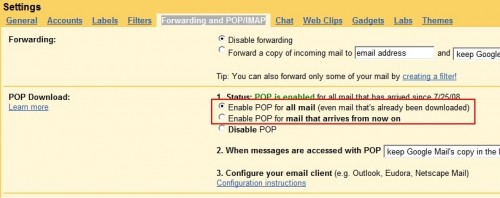
Open the Gmail homepage (gmail.com), log into your Gmail account and look for the Settings to open the Gmail configuration. Now select the [Forwarding and POP/IMAP] link which should open a page just like the one you see below on the screenshot.

You will get two options here to enable POP3. The first [Enable POP for all mail (even mail that’s already been downloaded)] enables POP3 in Gmail for all email messages even those that have already been retrieved while the second [Enable POP for mail that arrives from now on] enables POP3 from that moment on which means that old emails cannot be retrieved. Click on the Save Changes button will save the changes and allow POP3 connections.
Gmail POP3 Data
Now, create the accounts in the email client application because POP3 has been enabled in Gmail. The process can be slightly different depending on the email client you are using for example because every email client can have the different setting and page layouts so please enter all information carefully. Below are the values that you are going to need while configuring the email client.
Email Address: Enter your full Gmail email address
Password: Enter your email password
Incoming Server: pop.gmail.com
Incoming Server Port: 995
Outgoing Server: smtp.gmail.com
Outgoing server (SMTP) port: 587
Encryption: TLS


